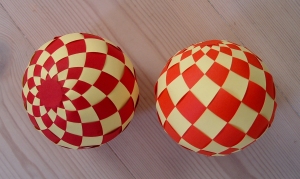
Carol from extremecards sent me a picture of a “Riemann sphere” and suggested to make a woven sphere. Here is the result.
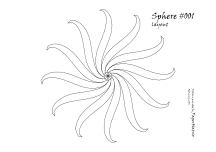
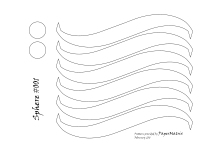
The exact shape of the strips was made by Anna using the Smash function in Rhino, see diagram. Because the size of the pattern is limited by the A4 sized paper an ordinary cutter or printer may manage, I had to figure out how the shape might be patched together by smaller pieces. I ended up with the pattern below.
Print/cut 4 sheets, two of each colour. Before you start weaving you must glue the 12 strips to the small circle forming the pattern on the diagram. Weaving the sphere is just like weaving a cone. Place the two pieces so that the circles line up and the strips go in opposite directions. Make sure that the colour you want on the outside shows the full circle and not the strips and glue. You must take great care to make a firm and tight weaving. Else the strips will not be long enough to form the same pattern on the other side of the sphere’s equator. There must be at least 10 paperclips in the shape at any time. When you have done all weaving glue stick the matching arms together two by two at the pole and finish covering the pole with another of the small paper circles. Weaving tight is a bit difficult. Don’t despair if you need to cover the top of the sphere with a small circle of the other colour.
This is a -.pdf file for cutting. sphere001 cut


Cannot wait to make it as it appears to be a lot of fun.
Thank you for sharing.
Happy thoughts,
Petrina
ty!
Is it too much to upload a vide of how you do this? Or post step-by-step instructions? : )
We do not have a video – yet. But take a look at the small pictures in the post on Egg #005. They may help you getting started.
Wow… I finally figured it out! The Egg pictures helped me out- I just did not know how to start it off- still probably the hardest thing I’ve done in a while! (I did the hot air balloon 1)- how long does it usually take you? I think I worked on one for an hour and a half, granted I used dinky little 8.5″ x 11″ printer paper just to practice, but still! I give you a lot of credit!
Pingback: Papirfolderier | Thinkingspace.dk
Thank you for sharing your knowledge, I am a practicing textile artist working with felt and wool at the moment and have found your work inspirational thank you again.
Pingback: Woven paper baubles | next to nicx
Oh, they are pretty!
Pingback: Project Idea: Woven Paper Ornaments « Design Rousings
Ii think that there should be more specific directions or diagrams It says to cut and print four sheets of two colors. paper.How big are the sheet. How many strips of each color. How do you begin. I looked at the egg diagrams and that wasn’t helpful. If it is possible to give more instructions, I would be happy.
The size of the paper is A4 i.e. app. 20 x 30 cm. Any size will do, as long as all arms are of equal size. You need 12 arms of each color. Each sheet includes 6 arms, thus you need to print 2 sheets of each color. You begin by gluing 12 arms to a small circle like in the pattern shown. This you must do twice. For weaving instructions hit the link “PaperMatrix on YouTube” in the blog’s upper right corner. Choose the balloon video part 1. The video shows how to start a balloon. Starting a sphere is just the same. Lene
How did u get the strips with rhino???
We are trying to do that, but our strips are more thight in the center of the strips than yours…
Try looking at the drawing posted with the Tournament Tent. Lene
Pingback: Weaving Paper | Anglo Saxon Celt Creates
I’ve been looking for a tutorial on this for a while! So glad I found your site! Thank you!
You are welcome. In general other bloggers and home pages are very good at providing a proper reference to the source of the items they show. Hopefully you have seen the item in the flesh. Lene
do you cut the paper by hand or by a machine?
We have digital cutters. But many of the simpler patterns may very well be cut by hand. You may print the patterns directly on the paper. Lene
omg i just had such fun with this one, thank you for sharing (it took me quite a while xD)
Paper balls are beautiful. Thank you for the template
Pingback: Woven Paper Sphere » unikatissima's
Pingback: Happy New Year: A Paper Ball « Helen Hiebert Studio
Hi,
It seems that the angles on the ends are actually 32 degree which means that 12*32 = 384 degrees. thus I managed to fit only 11 slices to the circle.
Hi Lars
Yes, you are right about the 32 deg angle in the original pattern published February 2011. I made dozens of spheres though, and did not notice and never had any problem. Possibly because I always fixed the small triangles to the circular piece in the following way: 1) Fix two opposing triangles to the round piece so that the points just meet in the center. 2) Fix the two triangles at perpendicular angles, points meeting in the center. 3) Fix the 4 sets of two triangles in between. In April 2013 I learned about the 32 deg angle and retraced the original pattern fitting it with a 30 deg triangle. This updated pattern was published in the blog carrying the title “Spheres updated”. I am very sorry for the inconvenience and I realize that a reference to the updated pattern is indeed required. Lene
Hi! I love your patterns and have made some of them that I really like!
People have been asking to buy. Please let me know if I can I sell what I make out of your pattern?
Thank yo again for sharing your talent
I am looking forward to hear from you
Hi Linda, Thank you so much for your interest. Please read our info on selling our designs on our FAQ page. Does your production require a commercial license?
Hi! I am new to paper weaving and I would like to know which model do you recommend me to start. Thanks for sharing your beautiful art with us…=)
Hi Luciana, it is a good idea to start with the hot air balloon. It is easier than the sphere, because you do not have to close the weaving in a single point. There is also a youtube tutorial, that show, how you can weave the balloon and sphere. Best, Anna
Thank you for showing Sphere #001 online. Our family loves making them as a way to relax.
Great to hear the design is of use to you. You are also wellcome to try the other projects on our page. Best Anna