


About joining
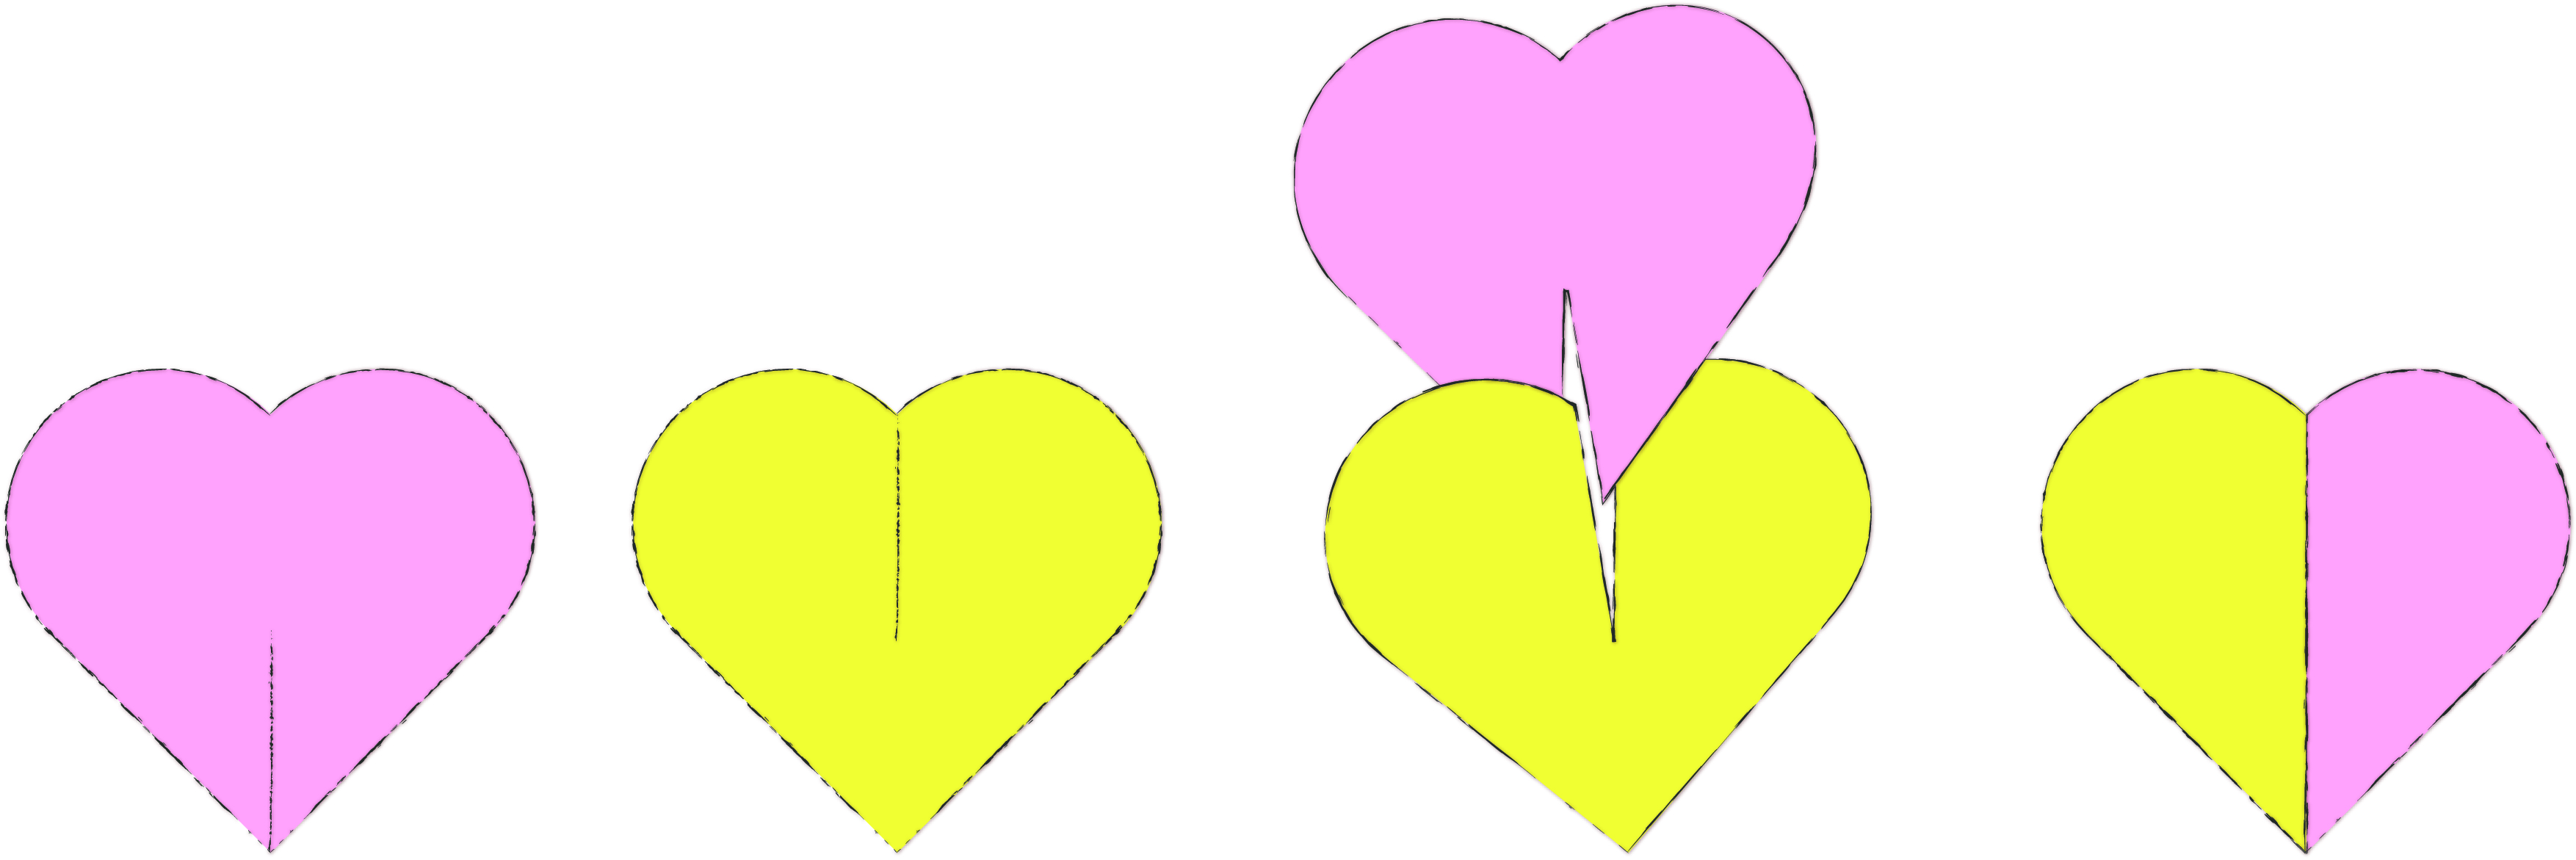
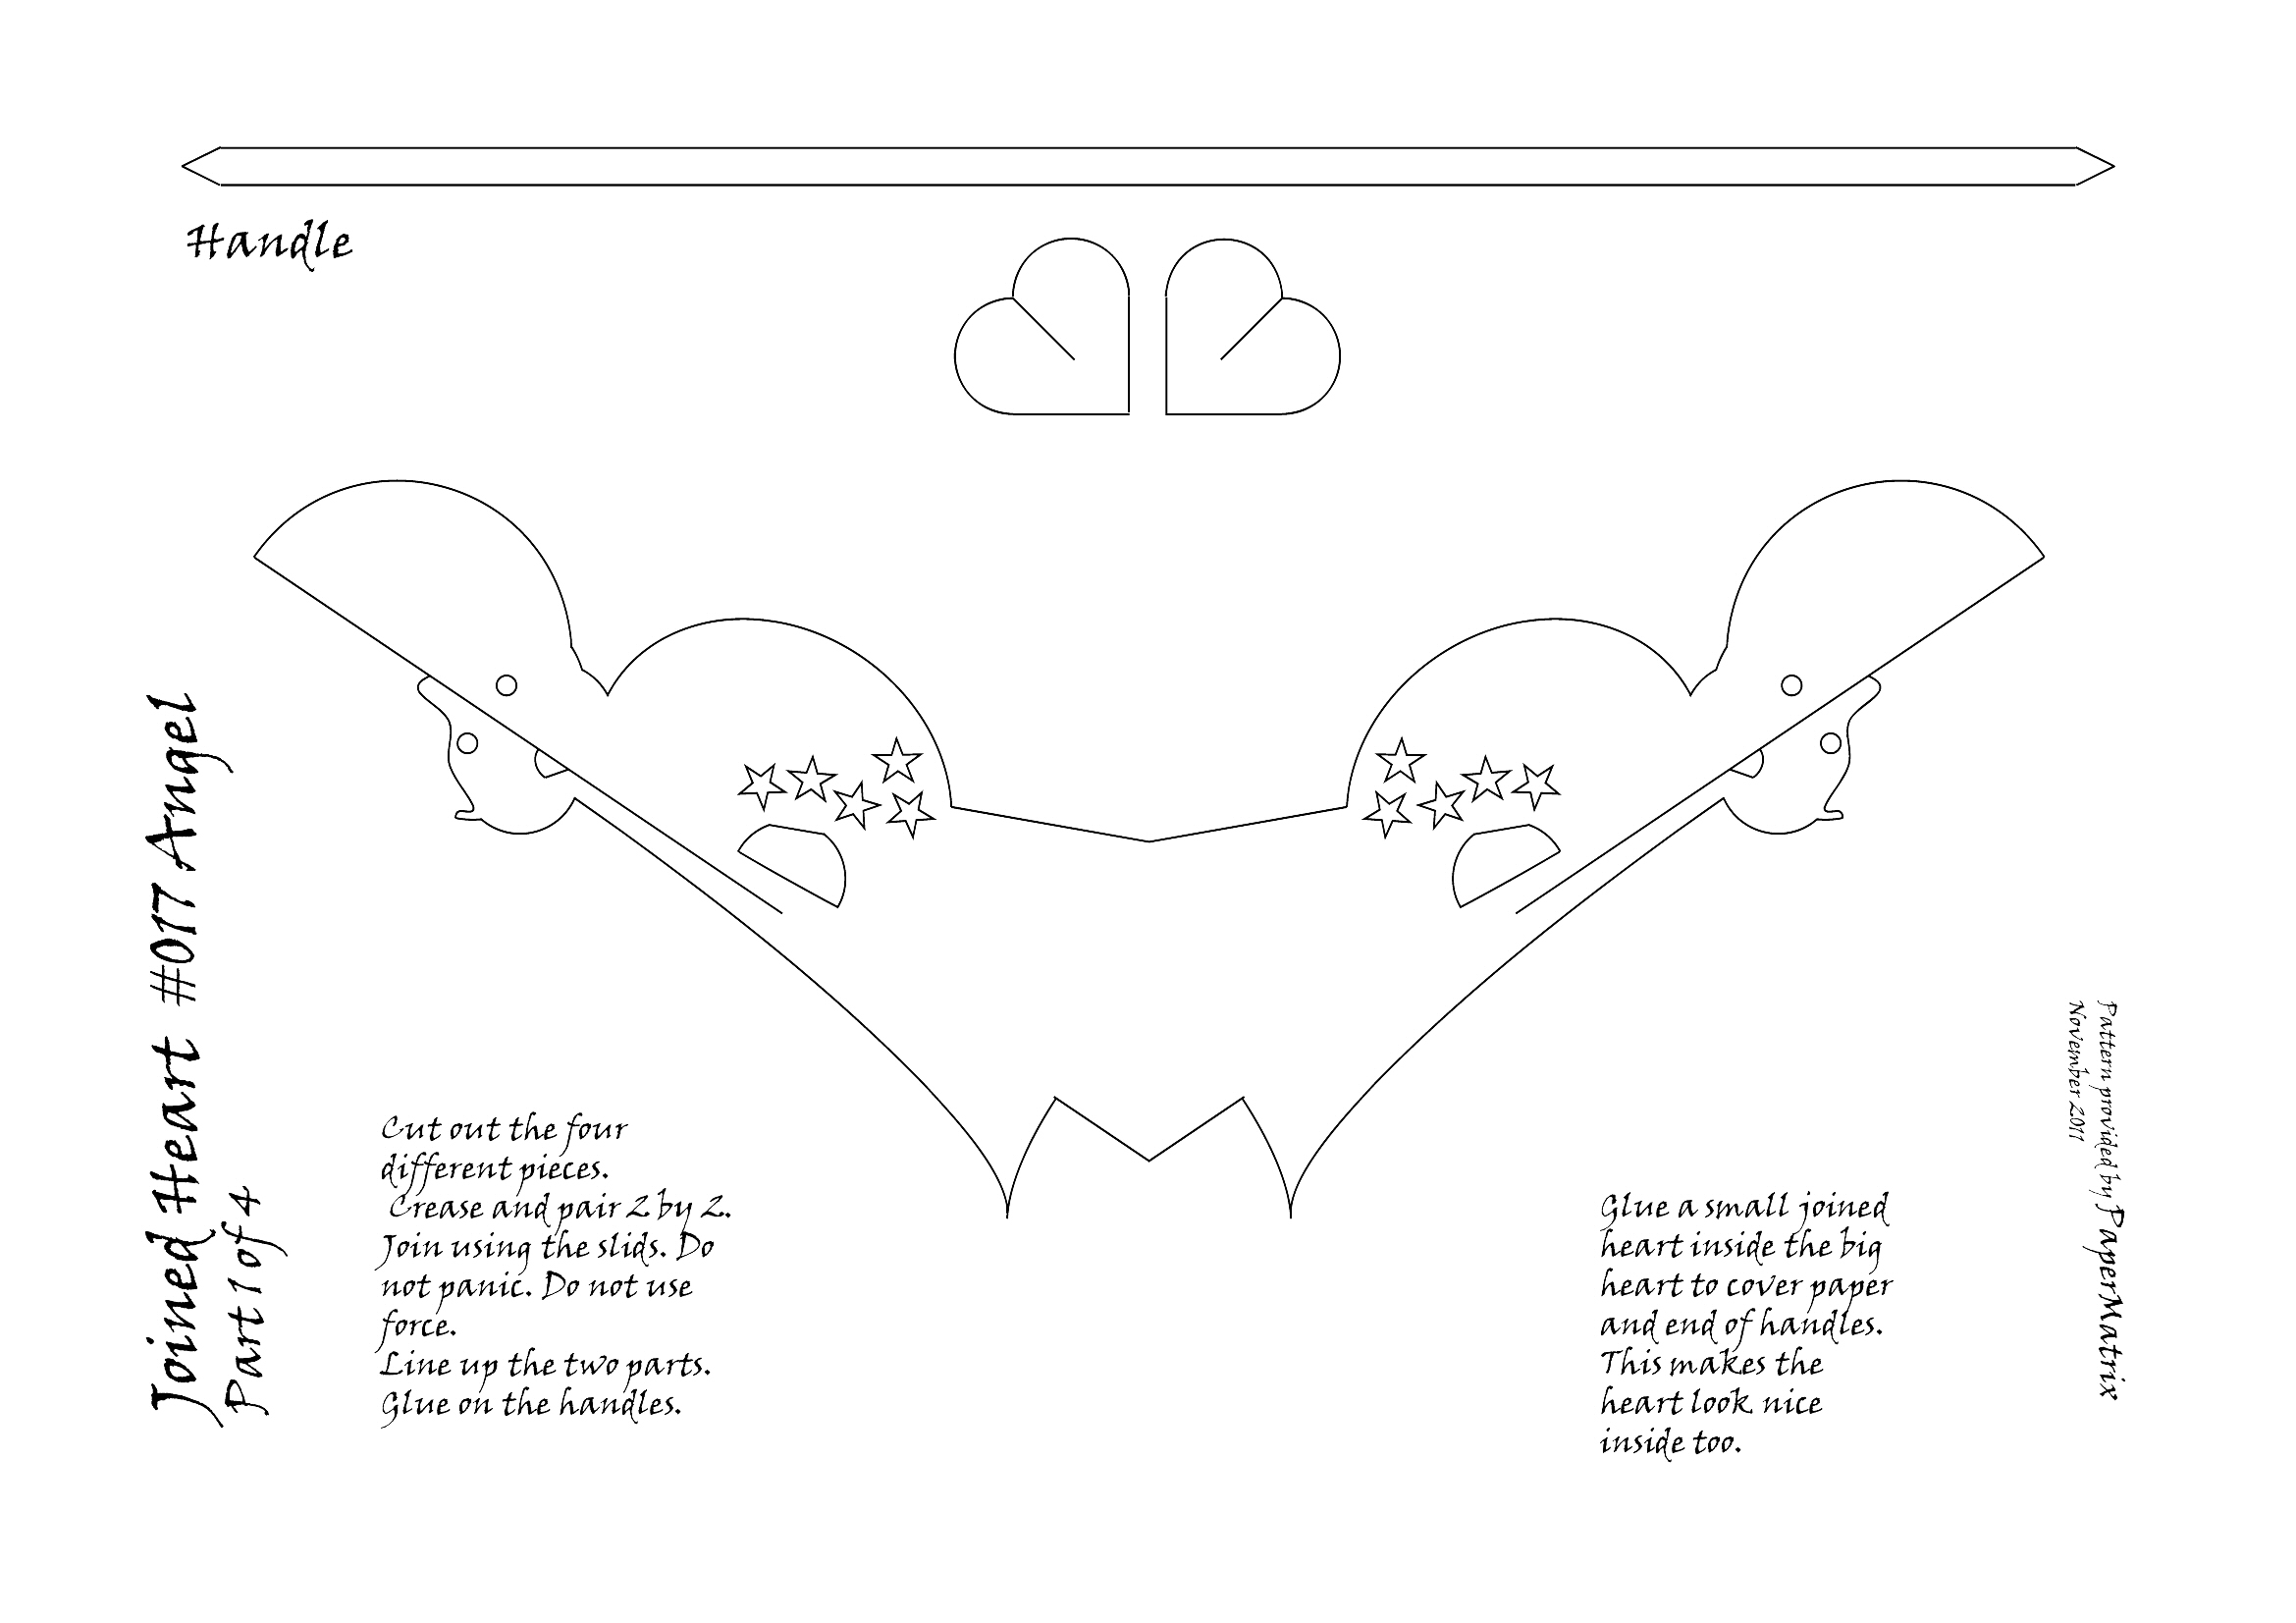
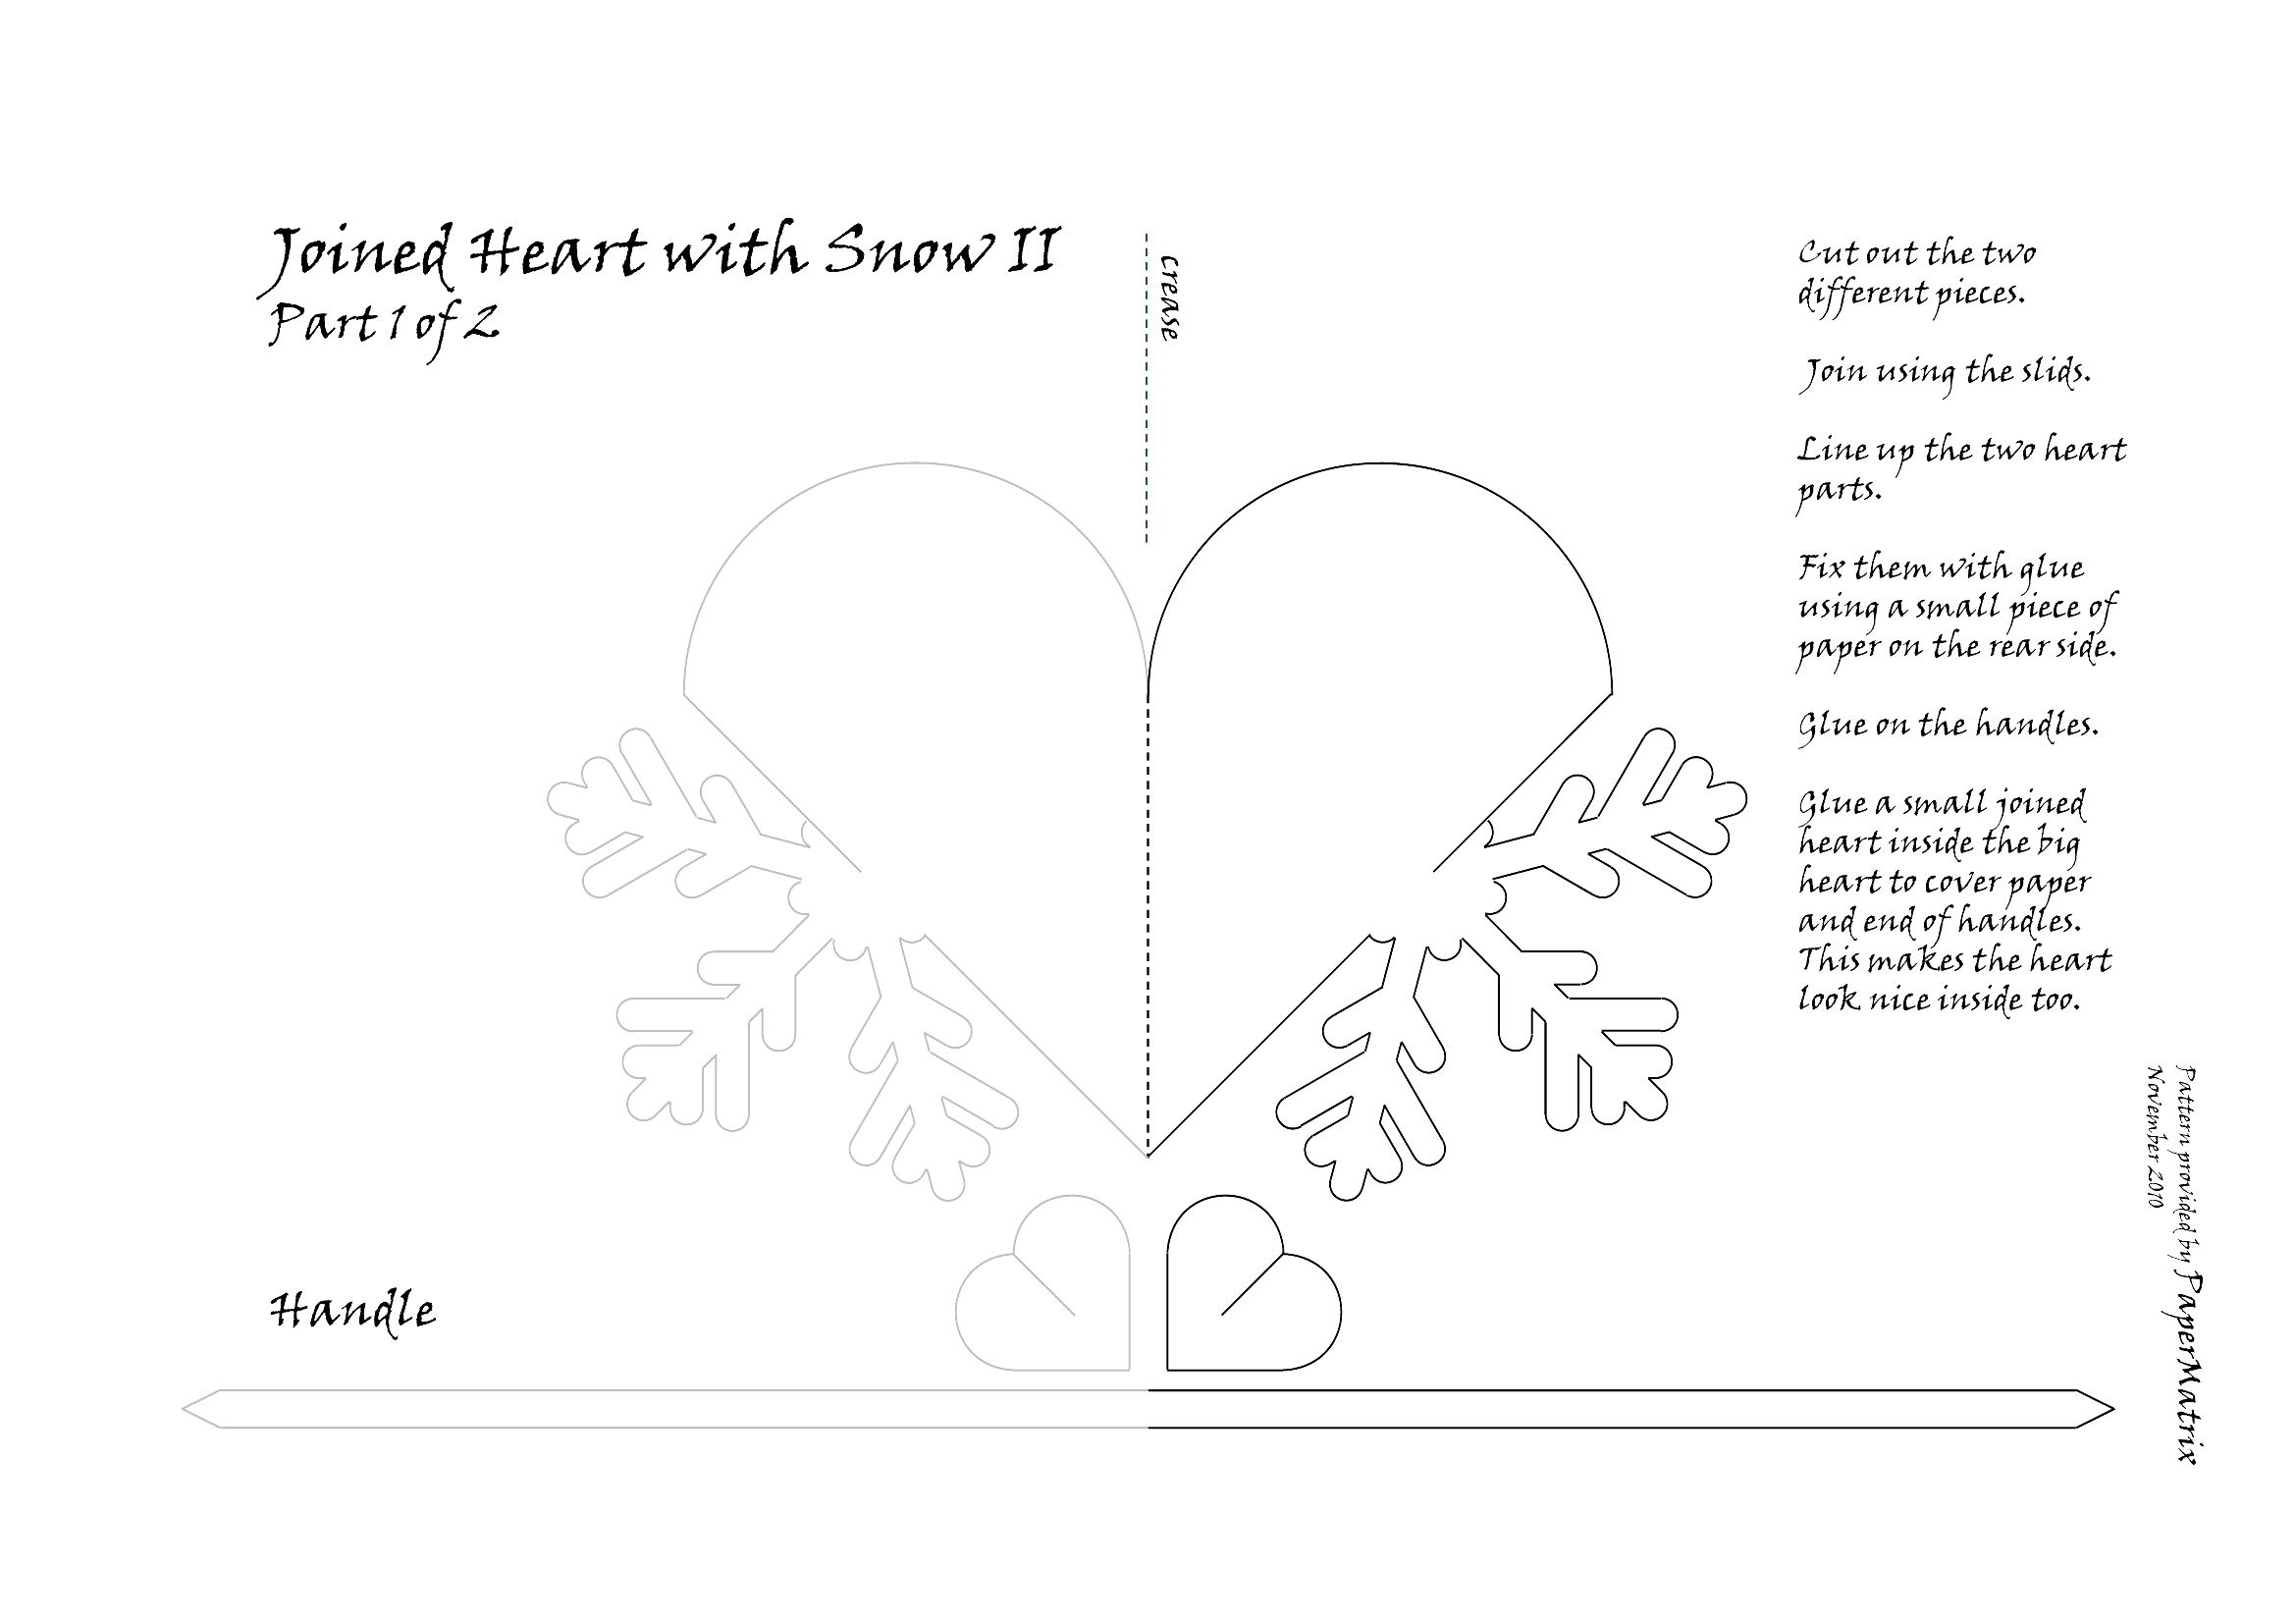
The best way to understand the concept of the joined hearts is to look at the small hearts included on each pattern. Print two sets using two different colours. To make a joined heart you need two of the small heart pieces, one with a slid in the upper half and one with a slid in the lower. Make a “double” heart by joining the two pieces using the slid. Now the right part of the heart has one colour, the left another. Having learned this, proceed to the post “Joined Hearts” from November 13. 2010. Print e.g. the two pieces of “Joined Heart with Flower”. Crease and join first one side and then the other. When this is learned you may proceed to the more complex baskets. Like the heart with the flower these baskets are made from two pieces. But in this case each piece is made from two or three layers in different colours. First fold and then insert one into the other. Join as you learned previously. Joining the more complicated baskets is however not quite easy. A point tends to become entangled with a hole in the base and the tops have a will of their own. Do not panic or get frustrated. Everything will come in place eventually. Just join using the slids little by little. It helps to do a little on one side and then on the other and then back etc. An option is to keep one side together using a couple of paper clips. Seen from the side the joined baskets are more or less flat.
About paper
In general I use 80 g/m2. This paper comes in many, many colours – if you are prepared to buy 500 sheets of the same. Sometimes you may find a package with 12 different colours. But particularly the darker colours are difficult to locate. Now and then I am lucky to find 90 g/m2 or 100 g/m2 (a great deal more expensive) writing paper in the colours I lack. This paper is much better quality and also survives the cutting machine better.
Links to Joined Baskets
This is a list of joined baskets from the blog. You may go to the post to get hints and directions on how to cut and join. Click the link above the picture.
Joined Basket #033 Valentine Heart


Joined Basket #032 Squares and Triangles


Joined Basket #030 Sugar Scull #02


Joined Basket #029 Sugar Scull #01


My wife and i really love these. What about in the shape of Butterflies. with summer coming on that could be really cool.
Thank you. I love feedback. Look carefully, and you will find a butterfly #009.
I am new to crafting and i find that i like papercrafts .papermatrix is the best by far place to learn, listen share and love . Thankyou for making all this possible.
очень красиво.
красота. а где взять шаблоны?
Under ‘CATEGORIES’ to the right, press the words ‘Joined Paper Hearts’ and you will find a list of posts including the patterns
I’m in LOVE with this website. Beautiful!
Hello !
your creations are absolutly amazing ! Could you tell me the dimensions of the sheets of paper you are usually using ? A4 ? A3 ?
Thank you very much to teach us your technic and the joining hearts.
Best wishes from France
Gaëlle
ps : holidays are here : it’s time to create a lot of joining hearts !
I use A4 inexpensive 80 g/m2 print paper. This comes in many colours, however not in the darker colors. Sometimes you may find some 100 – 110 g/m2 writing paper in dark colors. But it can be difficult to locate. Heavier paper than this I would not recommend for the woven objects.
Could you please provide information on your cutting machine that you mention. Your work in beautiful and I would like to give it a try.
My cutter is a Silhouette SD, a simple non professional craft machine. Easy to install and mechanically it has worked fine, no problems. Last Christmas Anna bought a newer model, same manufacturer. This machine is much like mine, but able to handle a larger paper size.
I just bought a Silhouette; until now I have been hand cutting your designs. LOVE THEM by the way, but am having trouble. the machine does not want to cut your designs. It will cut thier’s of course. So could you please help me and maybe other people as well. Thanks, I think your designs and your site is just WONDERFUL. I wish I had just a small bit of your talent. Paula
WordPress only supports uploading the most common types of file. Thus I provide simple vector-PDF cut files for download. You may transform them into the file type apt for your specific type and issue of cutting machine. In your case I would download and save the PDF file to my computer. Open the PDF in Inkscape or some other program that can edit vector files like CorelDraw or Adope Illustrator (Inkscape is free). Then save the file as DXF or SVG and open in Silhouette Studio or RoboMaster. Cut! It is simple and you might as well learn. It sets you free to make your own designs. Lene
I read under joined about the paper type. I am wondering where you buy it. I am thinking a stationery store maybe
Birthe
I go to the local office supplies store. They offer packages with 500 sheets A4 80 g/m2 in lots of colors. Whenever I come upon a shop selling stationary I always check to see if they would have something of interest. Also shops dedicated to arts and craft articles might have nice papers, these are however usually quite expensive although of better quality.
I tried posting this earlier, but for some reason, it doesn’t seem to have worked…
First of all, thank you for posting your beautiful projects online for everyone to enjoy making; I am looking forward to making several of your designs having done very basic paperweaving in school.
I do quite a bit of papercrafting, but have always found the hand-cutting out of parts for any project to be the worst part of the process. Thanks to you, I found out that there is a machine (Silhouette) that can cut out any design/pattern I want it to cut out (as opposed to the machine telling me what design/pattern it will cut out). I just recieved my Silhouette Cameo for Christmas and in trying to learn how to use it (the lack of a helpful user’s manual is resulting in quite the learning curve…)
My questions about your designs is how do I know how big/small to cut the parts/pages for each project, especially after I have converted the pdf files into the dxf file for a Silhouette Cameo to use? Currently, when I open up the files in the Silhouette program, they are all much larger than the 12 inch square mat meaning that I need to resize them to fit, but have no idea what size they should be.
Thank you again for your beautiful projects….I am having a hard time deciding what to try making first: the Sugar Skull joined heart, one of the cut/woven stars, or the woven pinecone (there are many others that I want to eventually make too).
Hi Kerry
You problem is not you problem alone. I absolutely hate the Silhouette Cameo’s automatic scaling. It was not like that in the good old days with the Silhouette SD.
Actually, there is no “correct” size. That is a matter of taste and size of paper. But it is obviously important and necessary that all the pieces for the same project are cut to the same scale.
I always take care when designing the templates to use the same page layout as basis for all templates belonging to the same project. Thus as long as you treat all sheets in the same way when downloading, importing to Inkscape, saving to dxf and opening in Silhouette Studio, they ought to be to the same scale.
For obtaining the “correct” size in an easy way, I have resigned. I measure the length of some straight horizontal or vertical line in Silhouette Studio and then I find the same line on my original. I calculate the ratio between these lenghts, “make” all templates on the same sheet in Studio and rescale all sheets using the rescaling tool. The original size you will find if you print the pdf with no automatic scaling to fit paper size. Lene
I would like to receive directions on creating the papermatrix Heart # 007. Our group is a nonprofit
ministry that mentors teen moms in high school (Young Lives, a national organization , out of Colorado).
We would like to use this craft for Valentine’s Day with the moms. If you can help we’d appreciate it
tremendously. Thanks
This is a great idea. First learn to make a simple basic heart with 4 strips. Then make Heart #007. You may prepare hearts that look impressively complicated just by adding an overlay in a contrasting color. For heart #007, we have designed a very simple overlay – it is just stripes a little narrower than those of the basic heart. You make the heart with overlay in almost the same way as the basic heart basket. The only difference is that you crease the overlay pieces along the short dashed line (the line of symmetry) and put them around the large heart pieces in the contrasting color before you start weaving. Enjoy. Lene
I love this website! I am new to paper crafting. I am finding it difficult to find step by step instructions on joined hearts. Specifically #042. The instructions you have on the site don’t make sense to me. Can you help? Thanks.
Thanks! For a more thorough instruction in weaving Heart #042 go to Heart #006. It is the same heart. The only difference is that when making Heart #042 each of the two pieces you weave together consists of two sheets of paper instead of one.
Joining is actually very simple. Go to the “Joined” page (see the black bar on top of the page) and scroll down to Joined Heart #001 – with a heart. Try making that and you will learn the principle. The other joined hearts are just the same. Lene
Thanks for your speedy response! I followed your instructions for Joined Heart #001 and it says the page cannot be found. Any ideas?
Thanks.
Oh, I am sorry for that. The bug is fixed. By the way, do also read the text “about joining” on the “Joined” page. Lene
Thanks! The instructions on the joined page say to locate the November 13, 2010 post. How do I find that post? I also see on Amazon that your book in English is coming out this summer. I can’t wait! Much of what I am wading through is terminology and lack of a u-tube or pictured step by step instructions. I know once I get the concept the whole world will open up…until then i will have endless questions. I so appreciate all your help.
Thanks
cotton
You may reach any of our posts simply by scrolling down on the PaperMatrix Blog’s front page. That might take some time. This is why we provided short cuts here and there.
– On the “Joined” page try e.g. to hover with the mouse’s pointer above the text “Joined Basket #001 Heart”. Then a label with the text “Go to Post” will appear. Click this link and it will take you to the post.
– You may also look in the list of “Categories” in the right column of the Blog. Here you will find the text “Joined Paper Hearts” If you click this link the page you see will only show Joined Hearts projects.
I hope this will help you to navigate. Lene
I am in love with this site. I stumbled across it on pinterest and i’ve been hooked. It’s quite hard for me to do this, (never learnt paper weaving in India) but i love the challenge. Amazing work you guys do.
Thank you. We always value to hear that our readers like our work. We admit that some models are quite difficult to make, but there are fortunately a lot, that’s easier. Lene